User Guide
- 1. Introduction
- 2. Using the User Guide
- 3. Quick start
- 4. Prefixes
- 5. Features
- 6. FAQ
- 7. Command summary
- 8. Glossary
1. Introduction
Financial Advisor Planner (FAP) is a desktop app for Financial Advisors (FA) to manage their clients, optimized for use via a Command Line Interface (CLI) while still having the benefits of a Graphical User Interface (GUI). If you can type fast, FAP can get your client management tasks done faster than traditional GUI apps. With FAP, you can now schedule your appointments, manage and find clients easily.
2. Using the User Guide
2.1 Navigating the User Guide
This section aims to help you navigate the user guide.
- The next subsection Section 2.2, Tips for reading the User Guide, provides some tips on reading this document.
- Section 3, Quick start has been provided to help you set up Financial Advisor Planner.
- Section 4, Prefixes has been provided where the prefixes are documented.
- Section 5, Features has been provided where the main features and their commands are documented.
- Section 6, FAQ has been provided where commonly asked questions are answered.
- Section 7, Command Summary has been provided where the commands are summarised in a list for easy reference.
- Section 8, Glossary has been provided where certain terms that are used in this document are defined.
2.2 Tips for reading the User Guide
2.2.1 General Symbols and Syntax
| Symbol/Syntax | Meaning |
|---|---|
command |
indicates commands or keywords related to commands that can be executed by the application. |
| indicates that the enclosed text is a tip | |
| indicates that the enclosed text is a warning and usually gives details about potential errors. | |
| indicates that the enclosed text are extra notes and information regarding the topic. |
3. Quick start
-
Ensure you have Java
11or above installed in your Computer. -
Download the latest
FAP.jarfrom here. -
Copy the file to the folder you want to use as the home folder for your FAP.
-
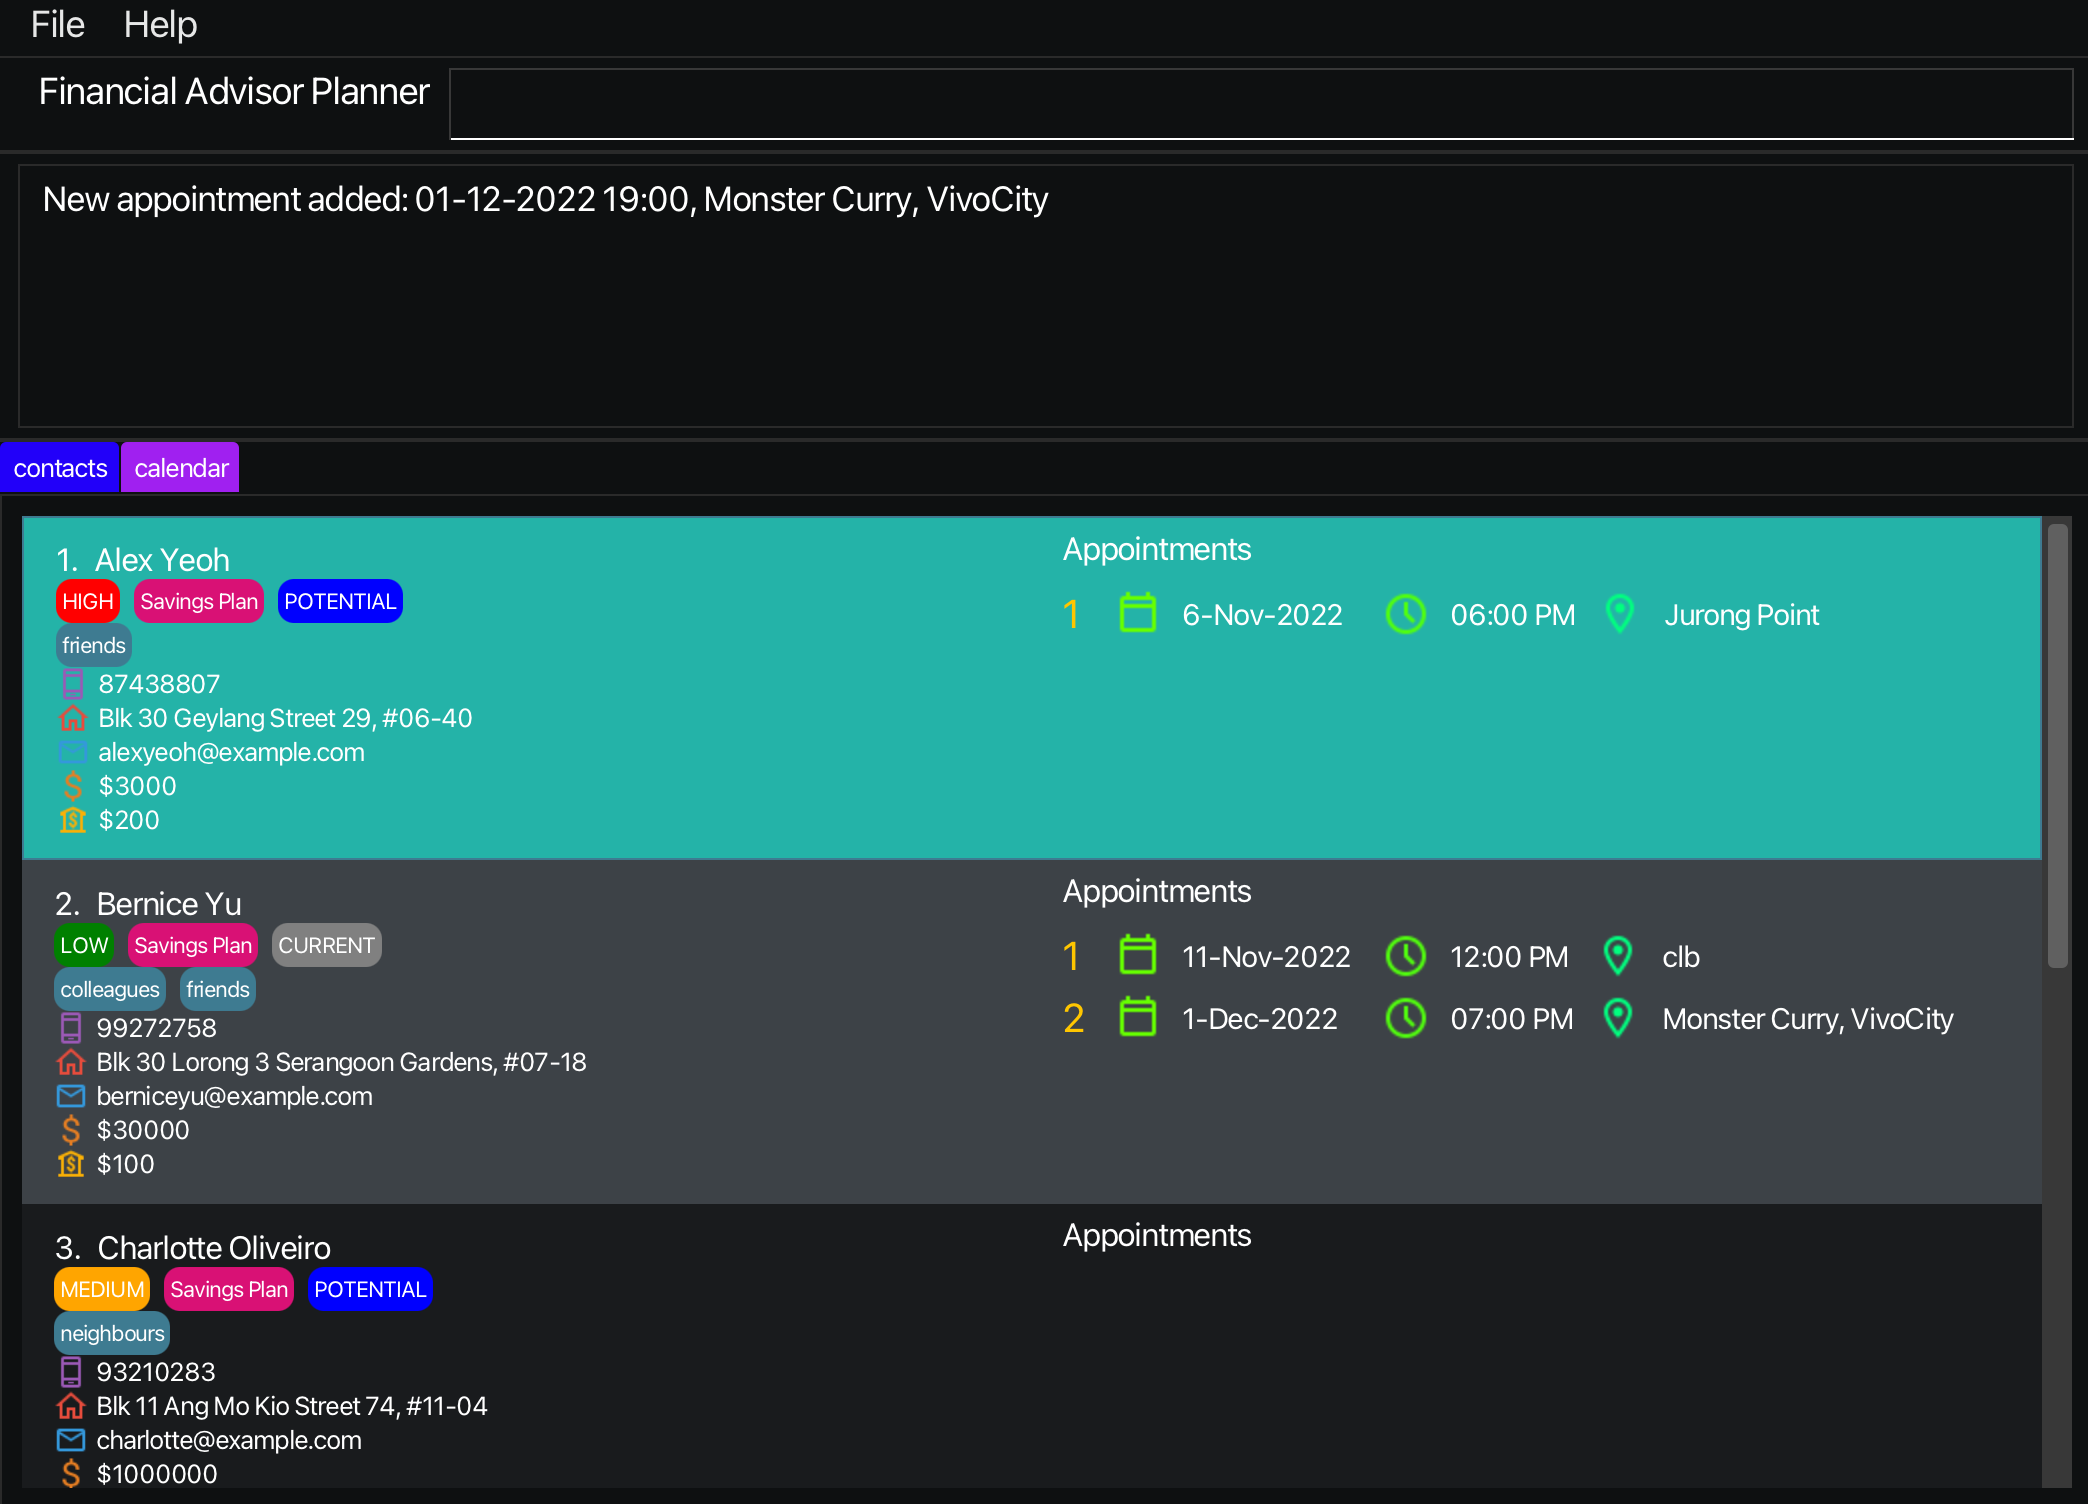
Double-click the file to start the app. The GUI similar to the below should appear in a few seconds. Note how the app contains some sample data.
-
Type the command in the command box and press Enter to execute it. e.g. typing
helpand pressing Enter will open the help window.
Some example commands you can try:-
list: Lists all contacts. -
addn/John Doe p/98765432 e/johnd@example.com a/John street, block 123, #01-01 i/60000 r/LOW m/1000 c/POTENTIAL: Adds a contact namedJohn Doeto the list of clients. -
aa1 d/21-01-2023 12:30 l/Jurong Point, Starbucks: Adds an appointment to the client in index 1 of the contact book with the date, time and location of the appointment. -
delete3: Deletes the 3rd contact shown in the current list. -
clear: Deletes all contacts. -
sortKEYWORD: Sorts the contacts based on theKEYWORD. -
findn/John: looks for contact that matches name (Prefix - n/) ‘John’ -
exit: Exits the app.
-
-
Refer to the Features below for details of each command.
3.1 Graphical User Interface overview
The following figures show the overall GUI of FAP
clear command to delete the sample data when using the application for the first time.
4. Prefixes
Prefixes are an indicator for a specific type of parameter to be input during any command. The following section shows the type of prefixes that are used in the app. It also shows which prefixes are available for the respective commands that uses prefixes.
| Prefix | Parameter | add | edit | find | aa | ea |
|---|---|---|---|---|---|---|
| n | NAME | |||||
| p | PHONE | |||||
| e | ||||||
| a | ADDRESS | |||||
| i | YEARLY_INCOME | |||||
| m | MONTHLY_CONTRIBUTIONS | |||||
| c | CLIENT_TYPE | |||||
| r | RISK_APPETITE | |||||
| ip | INVESTMENT_PLAN | |||||
| t | TAG | |||||
| l | LOCATION | |||||
| d | DATE_AND_TIME |
5. Features
This section contains all the information pertaining to the features of FAP
![]() Notes about the command format:
Notes about the command format:
-
Words in
UPPER_CASEare the parameters to be supplied by the user.
e.g. inadd n/NAME,NAMEis a parameter which can be used asadd n/John Doe. -
Items in square brackets are optional.
e.gn/NAME [t/TAG]can be used asn/John Doe t/friendor asn/John Doe. -
Items with
… after them can be used multiple times including zero times.
e.g.[t/TAG]…can be used ast/friend,t/friend t/familyetc. -
For keywords with multiple whitespaces in between the different words, these whitespaces will be replaced with 1 whitespace.
-
Parameters can be in any order.
e.g. if the command specifiesn/NAME p/PHONE_NUMBER,p/PHONE_NUMBER n/NAMEis also acceptable. -
If a parameter is expected only once in the command but if you specify it multiple times, only the last occurrence of the parameter will be taken.
e.g. if you specifyp/12341234 p/56785678, onlyp/56785678will be taken. -
Extraneous parameters for commands that do not take in parameters (such as
help,list,exitandclear) will be ignored.
e.g. if the command specifieshelp 123, it will be interpreted ashelp. -
Parameter hints will be shown after a command action.
![]() Warning regarding the use of the application:
Warning regarding the use of the application:
Other crucial files will be created and stored in the same folder that contains FAP.jar. These files are responsible for storing your data, hence it is advised to not delete or modify these files.
5.1 General command features
For more information on the command features, take a look at Section 6, FAQ.
5.1.1 Viewing help : help
Shows a message explaining how to access the help page.

Format: help
5.1.2 Adding a client: add
Adds a client to the list of clients.
Format: add n/NAME p/PHONE e/EMAIL a/ADDRESS i/YEARLY_INCOME m/MONTHLY_CONTRIBUTIONS r/RISK_APPETITE ip/INVESTMENT_PLAN c/CLIENT_TYPE [t/TAG]…
Refer to Prefixes for the types of prefixes.
- This command is case-sensitive for the parameters NAME, EMAIL, ADDRESS, and INVESTMENT_PLAN.
- After each execution of add command, the displayed contact list resets to the original contact list.
RISK_APPETITE can only have the values ‘HIGH’, ‘MEDIUM’ or ‘LOW’
INVESTMENT_PLAN must end with the word Plan
CLIENT_TYPE can only have the values ‘POTENTIAL’ or ‘CURRENT’
Do note that t/TAG is an OPTIONAL TAG, the rest are compulsory. That is to say that a client can have any number of tags, including 0.
Examples:
add n/John Doe p/98765432 e/johnd@example.com a/John street, block 123, #01-01 i/200000 m/5000 c/POTENTIAL r/Medium ip/Savings Plan
5.1.3 Listing all clients : list
Shows a list of all clients in the client list.
Format: list
5.1.4 Editing a client : edit
Edits an existing client in the list of clients.
Format: edit INDEX [n/NAME] [p/PHONE] [e/EMAIL] [a/ADDRESS] [i/YEARLY_INCOME] [m/MONTHLY_CONTRIBUTIONS] [r/RISK_APPETITE] [ip/INVESTMENT PLAN] [c/CLIENT_TYPE] [t/TAG]…
Refer to Prefixes for the types of prefixes.
- Edits the client at the specified
INDEX. The index refers to the index number shown in the displayed client list. The index must be a positive integer 1, 2, 3,… - At least one of the fields must be provided.
- After each execution of edit command, the displayed contact list resets to the original contact list.
- Existing values will be updated to the input values.
- When editing tags, the existing tags of the client will be removed i.e adding of tags is not cumulative.
- You can remove all the client’s tags by typing
t/without specifying any tags after it.
Examples:
-
edit 1 p/91234567 e/johndoe@example.comEdits the phone number and email address of the 1st client to be91234567andjohndoe@example.comrespectively. -
edit 2 n/Betsy Crower t/Edits the name of the 2nd client to beBetsy Crowerand clears all existing tags.
5.1.5 Find clients by keyword: find
Finds clients who match the find criteria.
Format: find PREFIX/ KEYWORD [MORE_KEYWORDS]
[n/ NAME [MORE_NAMES]]
[r/ RISK_APPETITE [MORE_RISK_APPETITE]]
[c/ CLIENT_TYPE [MORE_CLIENT_TYPE]]
[t/ TAG [MORE_TAGS]]
[p/ PHONE [MORE_PHONE]]
[i/ >/</= INCOME]…
Refer to Prefixes for the types of prefixes.
- The search is case-insensitive. e.g hans will match Hans
- At least one of the parameter fields must be provided.
- The find command finds on the currently displayed contact list.
- The order of the keywords does not matter. e.g. Hans Bo will match Bo Hans
- Only full words will be matched e.g. Han will not match Hans
- Clients matching at least one keyword will be returned (i.e. OR search). e.g. Hans Bo will return Hans Gruber, Bo Yang
- The search can be limited to certain categories by using find [CATEGORY] KEYWORD instead.
- E.g find p/87438807 will return John Doe
Examples:
john - HIGH, Alex Yeoh - HIGH, David Li - MEDIUM, John Doe - LOW
-
find n/ JohnreturnsjohnandJohn Doe -
find n/ alex davidreturnsAlex Yeoh,David Li -
find r/ highreturnsjohnandAlex Yeoh
5.1.6 Deleting a client : delete
Deletes the specified client from the list of clients.
Format: delete INDEX
- Deletes the client at the specified
INDEX. - The index refers to the index number shown in the current displayed client list.
- The index must be a positive integer 1, 2, 3, …
Examples:
-
listfollowed bydelete 2deletes the 2nd client in the list of clients. -
find n/Betsyfollowed bydelete 1deletes the 1st client in the results of thefindcommand.
5.1.7 Sorting: sort
- Returns all the contacts sorted by the given
KEYWORD
Format: sort KEYWORD / sort KEYWORD desc
Types of KEYWORD: name, appt, risk, income, monthly
- Sorts the contacts shown in the list of clients according to given KEYWORD. It is ascending by default.
- You can sort the contacts in descending order by adding
descbehind theKEYWORD. - The
KEYWORDis case-insensitive. e.g. sort NaME is the same as sort name. However, do note that the command word sort is case sensitive and must be in lower case. - Sort format:
-
namesorts by alphabetical order -
apptsorts by date and time -
risksorts from low to high or high to low -
income&monthlysorts by specified order (<, > or =) -
clientsorts by current or potential clients
-
Types of KEYWORD: name, appt, risk, income, monthly, client
- Returns all the contacts sorted by the given keyword
5.1.8 Clearing all entries : clear
Clears all entries from the list of clients.
Format: clear
5.1.9 Exiting the program : exit
Exits the program.
Format: exit
5.2 Appointment command features
5.2.1 Adding an appointment : aa
Adds an appointment with inputs DATE_AND_TIME and LOCATION for an existing client in the list of clients. This will also update the Calendar and the appointment will be shown in the matching month in the Calendar.
Format: aa INDEX d/DATE_AND_TIME l/LOCATION
Refer to Prefixes for the types of prefixes.
Example: aa 1 d/09-11-2022 12:30 l/Jurong
The appointment details will be added to the specified client’s information.
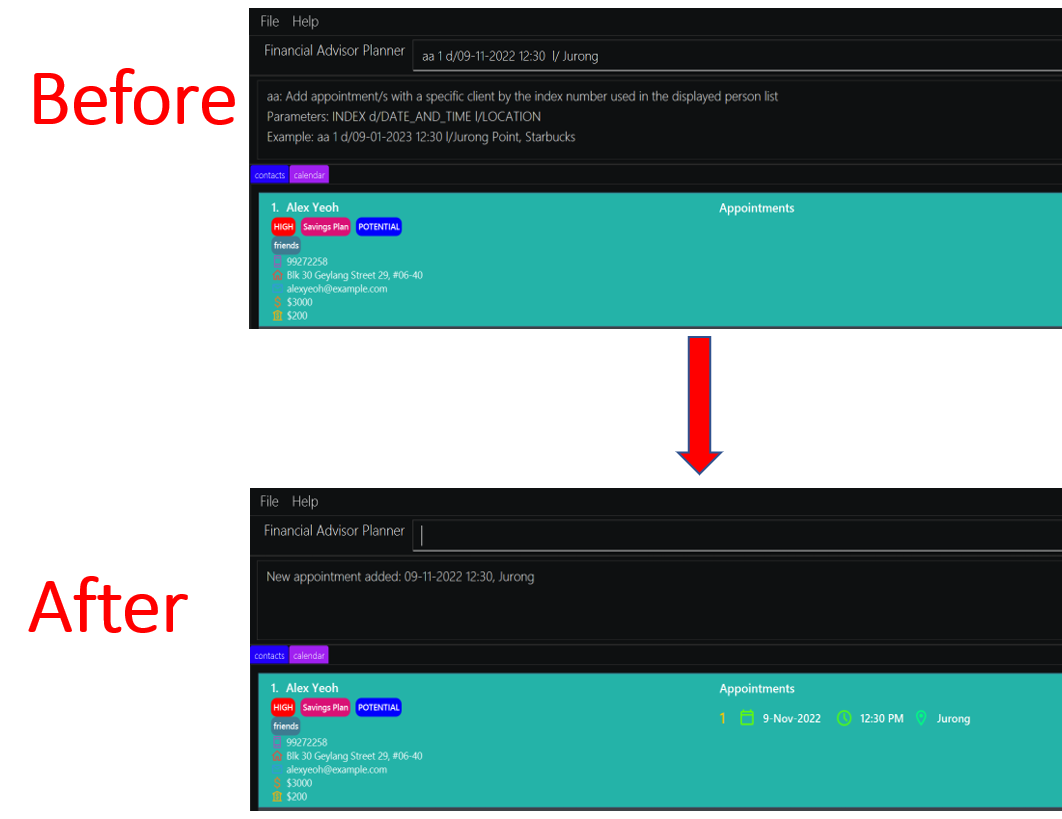
Also, the appointment details will be added to the calendar.
DATE_AND_TIME has the format
dd-mm-yyyy hh:mm (e.g “01-03-2022 18:00” represents 1st March 2022, 6:00 PM)
Month, Day, Hour, Minutes can only take in a 2 digit number
Year can only take in a 4 digit number
Input DATE_AND_TIME must be valid in order for the command to be executed
Each client can have a maximum of 3 appointments, and there cannot be appointments with the same DATE_AND_TIME in the overall list of appointments.
We allow the adding of appointments that are in the past, this is similar to any calendar apps where you can add events to dates that are in the past.
Examples:
aa 1 d/21-01-2023 12:30 l/Jurong Point, Starbucks
5.2.2 Editing an appointment : ea
Edits an appointment for an existing client in the list of clients. This will also update the Calendar and the appointment will be shown in the matching month in the Calendar.
Format: ea PERSON_INDEX.APPOINTMENT_INDEX [d/DATE_AND_TIME] [l/LOCATION]
Refer to Prefixes for the types of prefixes.
- Edits the client’s appointment using specified PERSON_INDEX and APPOINTMENT_INDEX.
- The PERSON_INDEX refers to the index number shown in the displayed client list. The index must be a positive integer 1, 2, 3,…
- The APPOINTMENT_INDEX refers to the index number shown in the displayed client’s appointment list. The index can only be 1, 2, or 3.
- At least one of the optional fields must be provided.
- Existing values will be updated to the input values.
Examples:
-
ea 1.1 d/21-01-2023 12:30 l/West Mall, StarbucksEdits both the date and location of the 1st client’s 1st appointment to be21-01-2023 12:30andWest Mall, Starbucksrespectively. -
ea 2.3 l/NUS, TechnoEdgeEdits the location of the 2nd client’s 3rd appointment to beNUS, TechnoEdge
5.2.3 Deleting an appointment : da
Deletes an appointment for an existing client in the list of clients. This will also update the Calendar and the appointment will be shown in the matching month in the Calendar.
Format: da PERSON_INDEX.APPOINTMENT_INDEX
- Deletes the client’s appointment using specified PERSON_INDEX and APPOINTMENT_INDEX.
- The PERSON_INDEX refers to the index number shown in the displayed client list. The index must be a positive integer 1, 2, 3,…
- The APPOINTMENT_INDEX refers to the index number shown in the displayed client’s appointment list. The index can only be 1, 2, or 3.
Examples:
-
da 1.1Deletes the 1st client’s 1st appointment
5.3 Calendar features
![]() Notes about the switching between Contacts and Calendar Tabs:
Notes about the switching between Contacts and Calendar Tabs:
-
CTRL + 1keys will switch the current tab to the Contacts tab -
CTRL + 2keys will switch the current tab to the Calendar tab
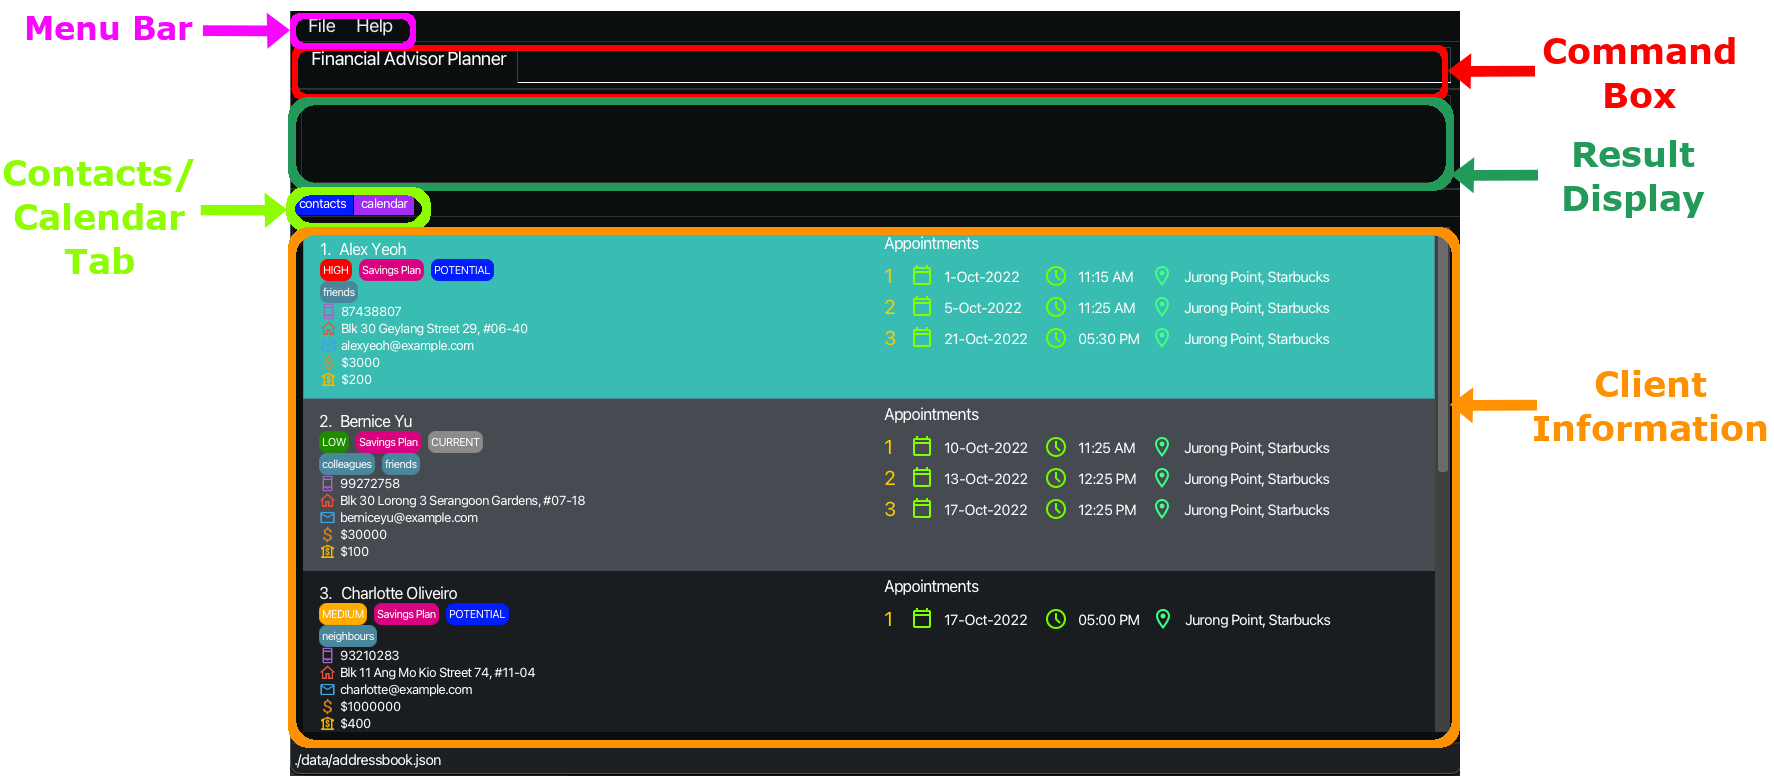
5.3.1 Calendar Display
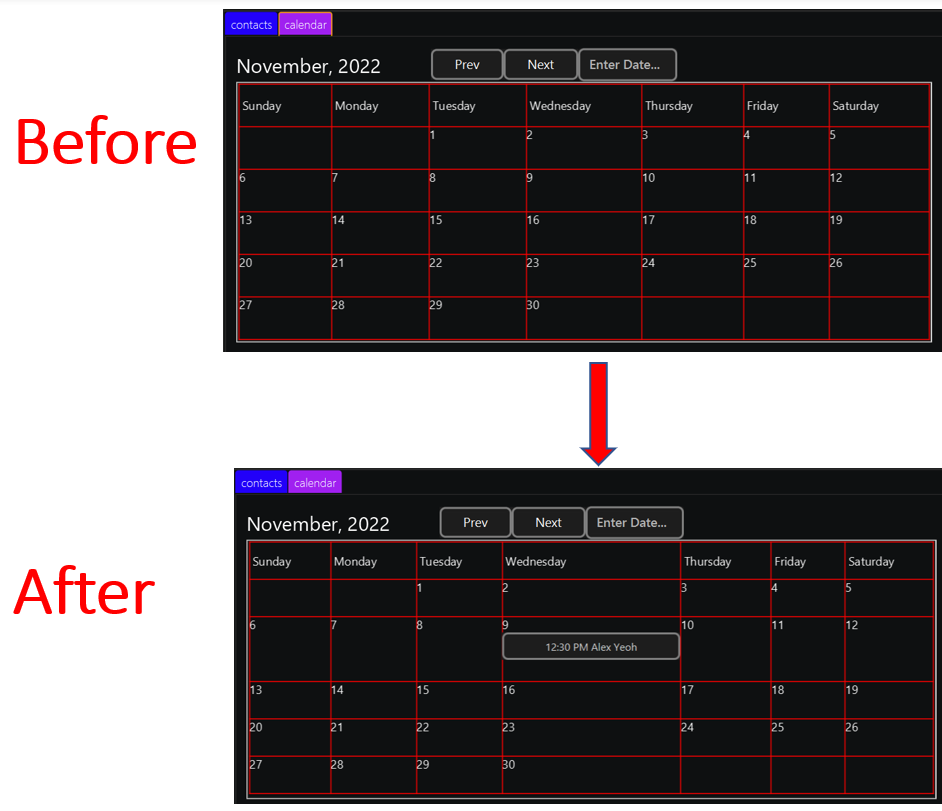
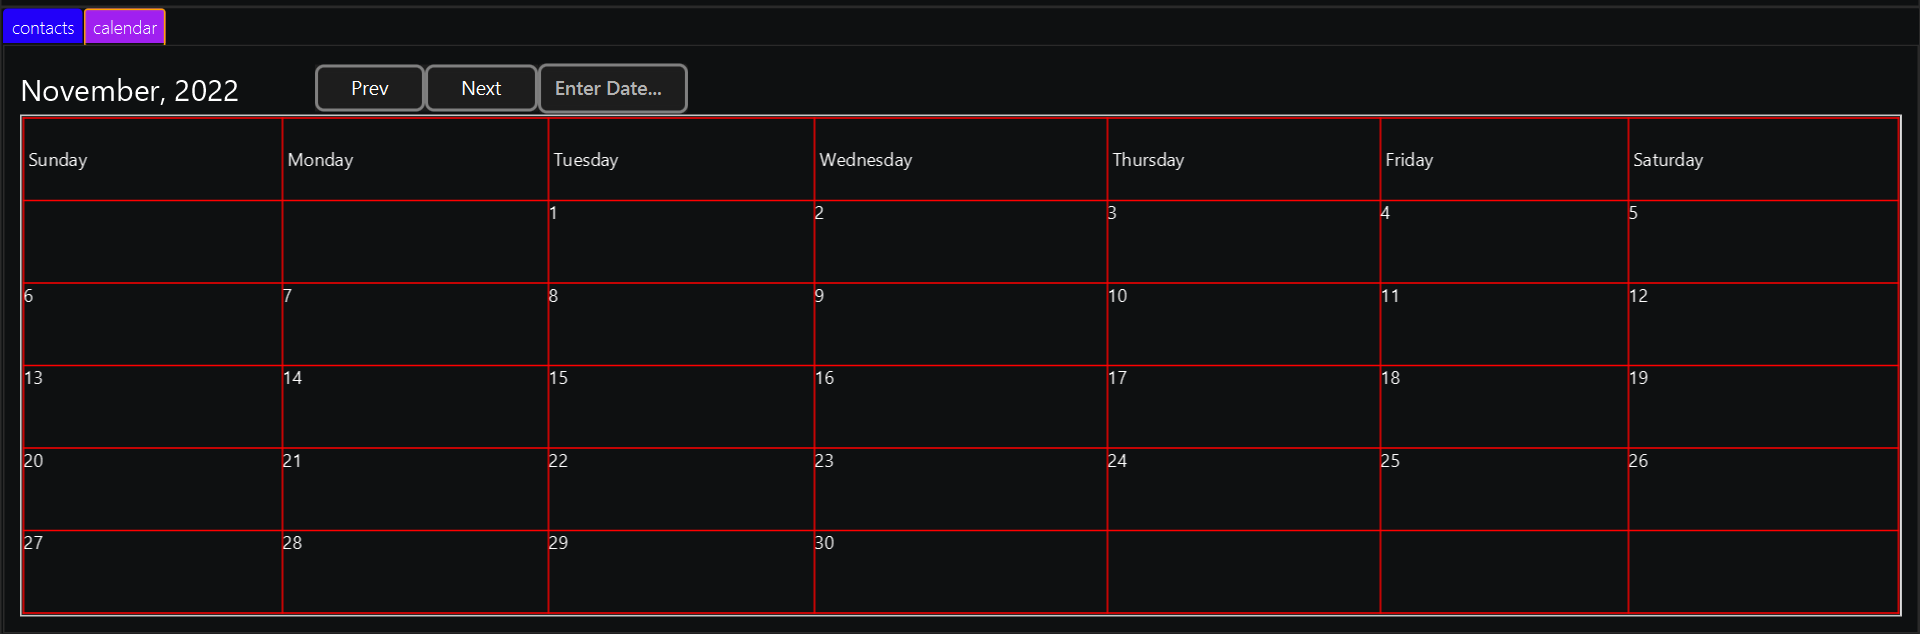
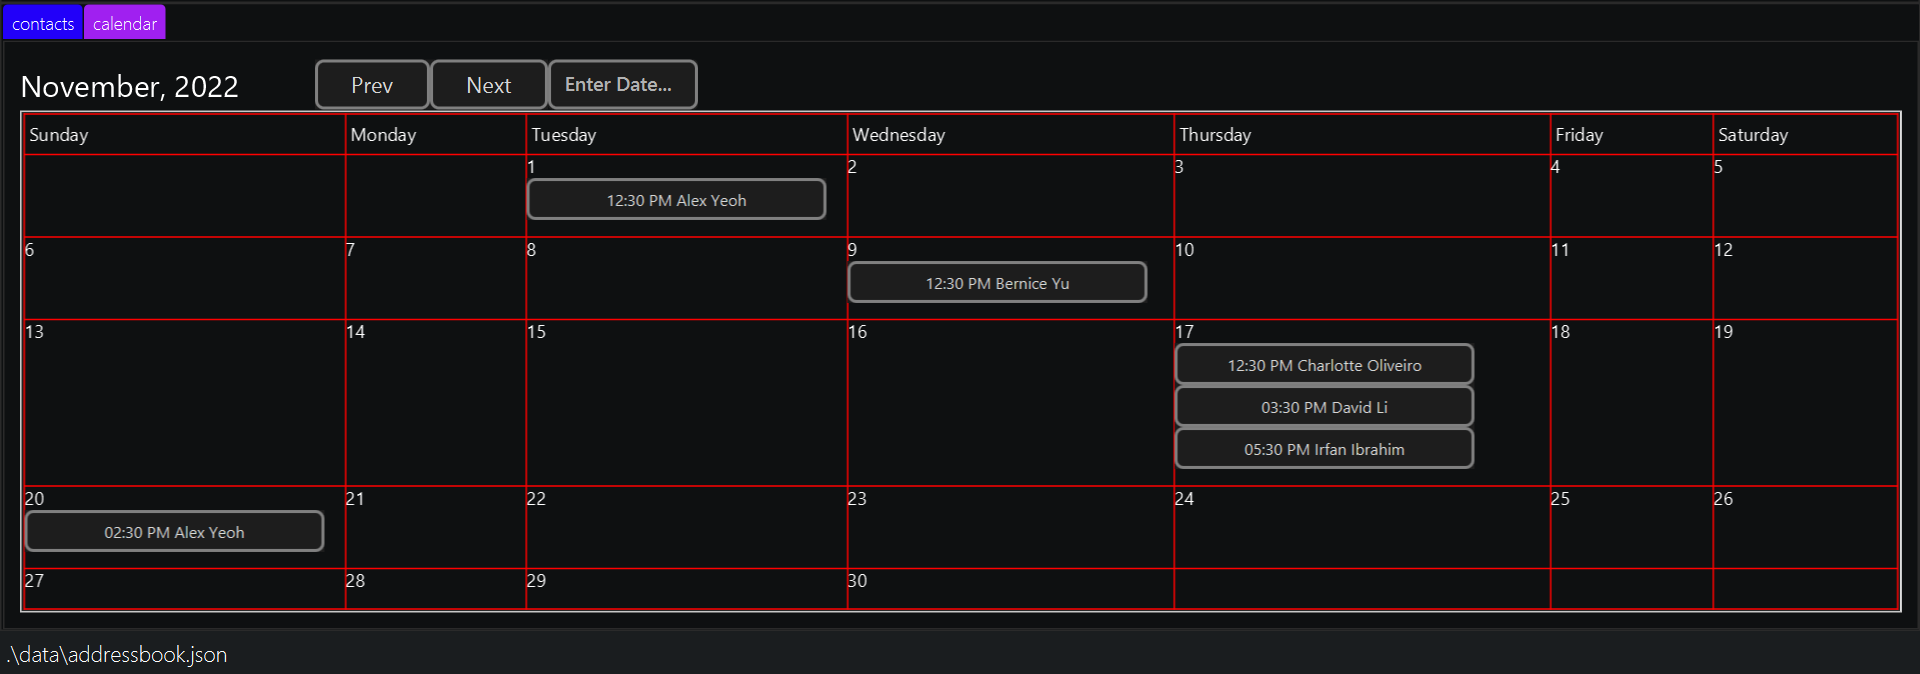
Displays a calendar format for the current month which shows all the appointments separated into their matching dates for that month. The appointments that are displayed for each day are also sorted in ascending order, which follows the time convention.
The following figure shows an empty Calendar Display:
The Calendar Display can be filled by adding appointments. View Section 4.2.1 for information on how to add appointments
The following figure shows the Calendar Display with several appointments:
5.3.2 Calendar Navigation
There are 3 ways to ease navigation between months that are displayed.
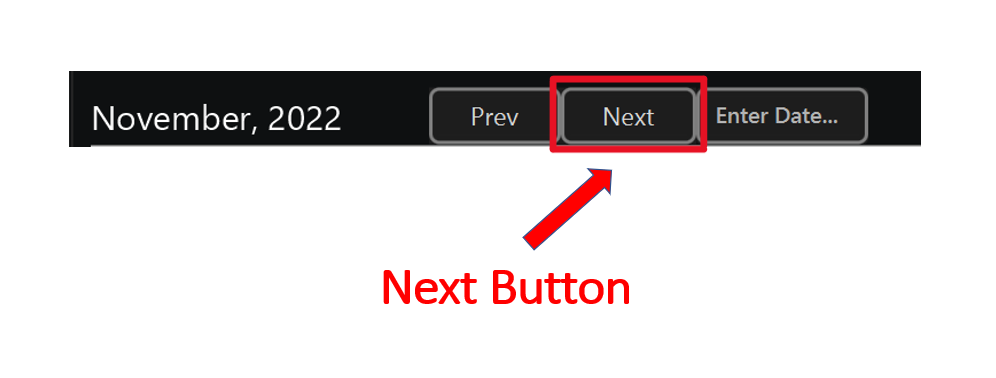
5.3.2.1 Next Button
Clicking the Next button or pressing the “N” key will display the next month. Examples:
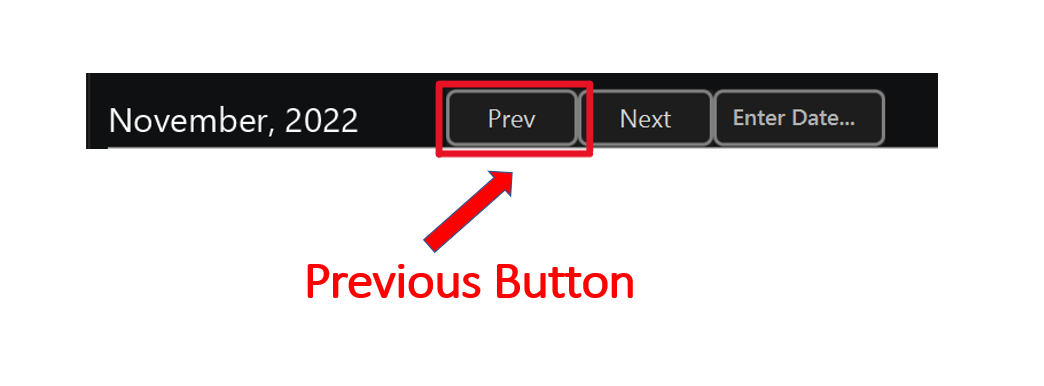
5.3.2.2 Prev Button
Clicking the Prev button or pressing the “B” key will display the previous month. Examples:
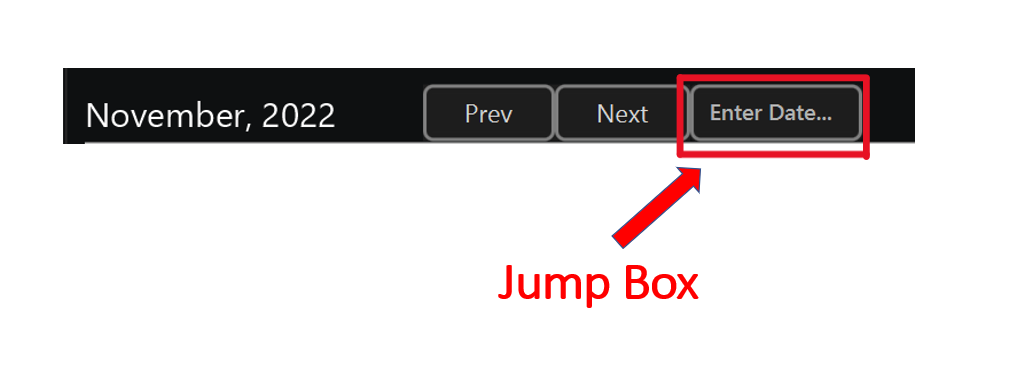
5.3.2.3 Jump Box
Typing in the desired date in the provided text field followed by pressing the “ENTER” key will show the given calendar of the month and year.
Format: DATE in dd-MM-yyyy
Examples: 24-04-2023
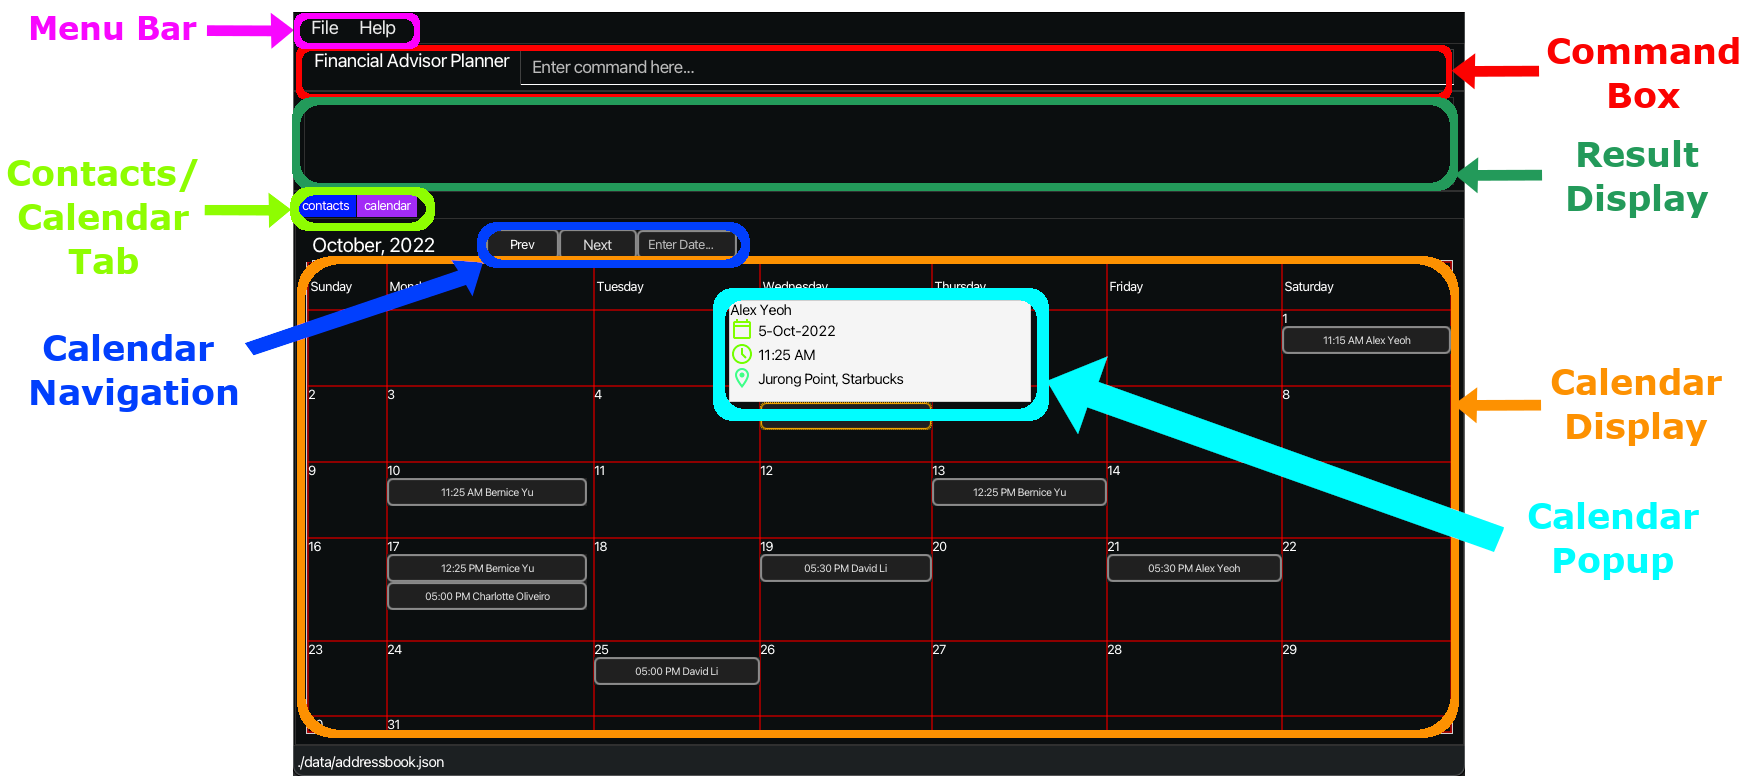
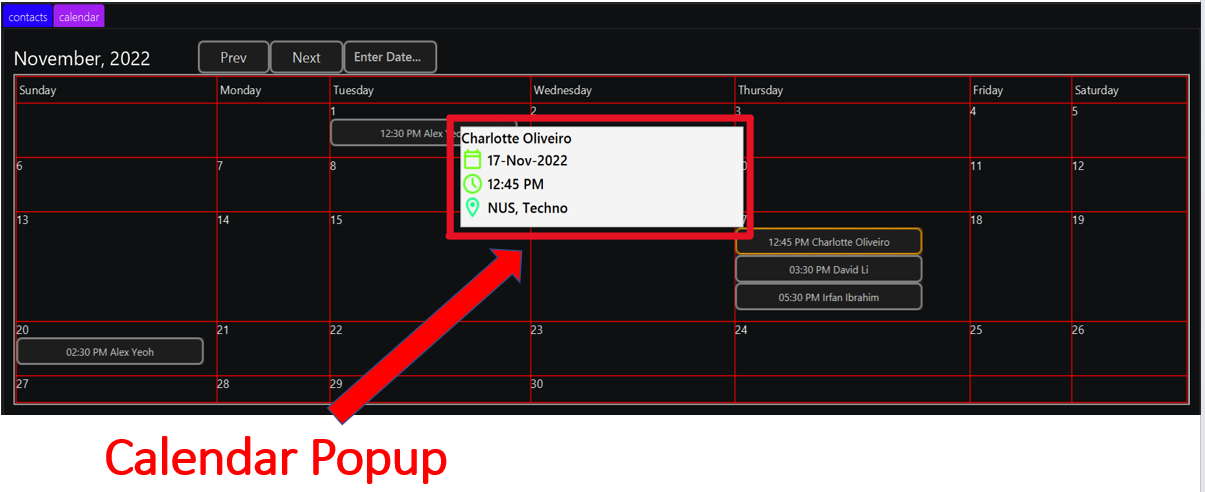
5.3.3 Calendar Pop-ups
Displays more detailed information of the selected appointment on the calendar which includes the name of the client, date, time and location of the scheduled appointment.
There are 3 ways to activate the Calendar Popup:
- Clicking on the client’s appointment button.
- Pressing TAB/SHIFT + TAB key within the Calendar View to focus on the desired client’s appointment button.
- Pressing UP/DOWN/LEFT/RIGHT key within the Calendar View to focus on the desired client’s appointment button.
The following figure shows the Calendar Popup being activated within the Calendar View:
5.4 Command Line tools
5.4.1 Parameter hints
After typing in the command word, the command’s parameters and their respective prefixes are shown. An example of a valid command will also be shown.

5.4.2 Command history
Use the up and down keys to navigate through previously typed commands. Users can edit the command first or press enter to execute the command.
- Only valid commands will be saved in the command history
- Command history will only save up to 20 previously typed valid commands
- Consecutive duplicate commands will not be saved (e.g entering “list” 3 times in a row will only add “list” to command history once)
5.5 Miscellaneous commands
5.5.1 Saving the data
FAP data are saved in the hard disk automatically after any command that changes the data. There is no need to save manually.
5.5.2 Editing the data file
FAP data are saved as a JSON file [JAR file location]/data/FAP.json. Advanced users are welcome to update data directly by editing that data file.
5.6 Future features
5.6.1 Archiving data files [coming in v2.0]
Details coming soon …
6. FAQ
Q: How do I transfer my data to another Computer?
A: Install the app in the other computer and overwrite the empty data file it creates with the file that contains the data of your previous FAP home folder.
Q: Why do you allow duplicate email and phone number in your add command, given that there won’t be two people with the same email or number?
A: Currently we only have duplicate checks for name. We will implement duplicate checks for email and phone number in the future.
Q: Why can’t I add appointments even though I typed the date_time correctly?
A: Check that Month, Day, Hour, Minutes is a 2 digit number and Year is a 4 digit number!
7. Command summary
| Action | Format, Examples |
|---|---|
| Add client |
add n/NAME p/PHONE_NUMBER e/EMAIL a/ADDRESS i/YEARLY_INCOME r/RISK_APPETITE m/MONTHLY_CONTRIBUTIONS c/CLIENT_TYPE [t/TAG]… e.g., add n/James Ho p/22224444 e/jamesho@example.com a/123, Clementi Rd, 1234665 i/60000 r/Low s/1000 t/friend t/colleague
|
| Add Appointment |
aa INDEX d/DATE_AND_TIME l/LOCATION e.g., aa 1 d/21-01-2023 12:30 l/Jurong Point, Starbucks
|
| Edit |
edit INDEX [n/NAME] [p/PHONE_NUMBER] [e/EMAIL] [a/ADDRESS] [i/YEARLY_INCOME] [r/RISK_APPETITE] [m/MONTHLY_CONTRIBUTIONS] [c/CLIENT_TYPE] [t/TAG]…e.g., edit 2 n/James Lee e/jameslee@example.com
|
| Edit Appointment |
ea PERSON_INDEX.APPOINTMENT_INDEX [d/DATE_AND_TIME] [l/LOCATION] e.g., ea 1.2 d/21-01-2023 12:30 l/NUS, TechnoEdge
|
| Clear | clear |
| Delete |
delete INDEXe.g., delete 3
|
| Delete Appointment |
da PERSON_INDEX.APPOINTMENT_INDEX e.g, da 1.2
|
| Find |
find PREFIX/KEYWORD [MORE_KEYWORDS] e.g., find n/James Jake
|
| Sort | sort KEYWORD, sort KEYWORD desc |
| List | list |
| Help | help |
| Exit | exit |
8. Glossary
| Term | Meaning |
|---|---|
| Command Line Interface (CLI) | A CLI is a text-based user interface that allows users to input commands in the form of text. |
| Graphical User Interface (GUI) | A GUI is a graphics-based user interface that allows users to interact with elements such as icons and buttons when running a program. |
| Command | An instruction given by the user that is to be executed. |
| Parameter | Variables that have been typed by the user that is to be provided to the command to be executed. |
| Prefix | Indicator for a specific parameter to be input during the command. Prefixes end with a slash (/) |